expr:class='"loading" + data:blog.mobileClass'>

Wednesday, 4 January 2012

a winters tail...

It's the start of a New Year and for my first recipe I am going to ask all my vegetarian friends to look away now, as I share with you my very favorite cut of meat.

Oxtail is the most unctuous and flavoursome cut of beef, my personal favorite and still inexpensive enough, despite the popularity of it on the menus of many prestigious restaurants. When you buy an oxtail it is generally cut into sections, across the tail, in rounds of oxtail on the bone. These are just perfect for casseroles or braising. Oxtail is a tough, gelatinous cut of meat that really has to be slow cooked to tenderise, but also to extract that lovely gelatin which adds body to the stewing liquid. The oxtails are fatty, so are really best cooked a day ahead, so they can chill overnight and have the fat removed from the top the next day.


You can of course serve the oxtails with the bone-in, but because the meat is so easily removed from the bone I always think it better to do just that before dishing up, as it really doesn't take long at all.

There are many ways of cooking oxtail, and while I don't think I can pick a favorite, this recipe makes for a robust and rich pasta dish. Warm crusty bread is all that is needed as an accompaniment to mop up the last of this most delicious ragu. As with all 'Slow Cooking' you will need a low to moderate heat in your oven - I cook this in the lower oven of the range which is about 120C for at least 3 hours, times and heats being approximate.

1.5lb oxtail – cut into sections
1 small onion – finely chopped
1 carrot – finely chopped
1 stalk of celery – finely chopped
2 - 3 glasses of red wine
2 bay leaves
4 thyme sprigs
1 tablespoon of tomato paste
Beef stock
Olive oil

Your choice of pasta (I like a wide papardelle with this) with parmesan and fresh basil to serve.


In a large frying pan, heat some olive oil. When hot, start browning the oxtail pieces. Don’t overload the pan – do it in two batches if you must. When the oxtail is nicely colored, remove from the pan to a plate.

Add a little more oil to the pan, if required, and gently cook the onion, carrot and celery until soft, then pour in the red wine. Deglaze the pan, scraping around to get the tasty bits off the bottom. When the wine has reduced a bit, stir in the tomato paste and transfer to your casserole dish. Add in the browned oxtail and tuck in the herbs.

Put the oxtail into a heavy casserole dish that has a well-fitting lid. Pour in the red wine, stock and vegetables. Add enough water to get the liquid level about half way up the side of the meat if necessary, keeping it topped up with water during the cooking to this level if needed. Cover the dish tightly either with a lid, or foil, and place in the oven for about 4 hours until the meat is falling off the bone.

Remove the meat from the sauce and when cool enough to handle, pull the meat off the bone, and chop. Skim any fat from the top of the braising liquid. In a medium pan, combine the meat and liquid from the braise, discarding the bay and thyme leaves. Cover the pan loosely, and simmer for a further 20 minutes.

Cook the pasta until it still has a little bite.

Toss the pasta with oxtail ragu. Serve with some freshly grated parmesan, and a few sprigs of basil.

Saturday, 24 December 2011

'tis the night before christmas...


'While visions of sugar-plums danced in their heads'


Merry Christmas from  'Warm & Snug & Fat' and thank you for visiting during the year.

Amee

Thursday, 22 December 2011

home for christmas...


More is expected of the Christmas gingerbread biscuit than any other cookie dough. It must taste good and have a nice spicy kick to stand up to the sweet icing that it is often decorated with. It must last a long time when hung as a decoration and it must withstand being fashioned into architectural marvels without risk of collapsing.


I have made this dough a few times already in the last couple of weeks as it ticks all the boxes. They have been shaped, iced and dispatched as presents to the childrens' teachers, all prettily packed in little boxes. The gingerbread house has been made and is still standing proud even after being decorated by two of the clumsiest four year olds on the planet, a veritable Christmas miracle!

I like to eat them on their own without the icing and can (humbly) say that they are one of my favorite little biscuits of all time!

This recipe can be used to make a whole range of decorations, buildings, gifts and, of course, gingerbread people. Children love to help roll and cut out the dough and to decorate the biscuits. I buy the squeezy tubes of colored icing and let them go nuts with it. There is no need to chill the dough before rolling it.


Wholemeal Gingerbread Biscuits
(adapted from a Waitrose recipe)

125g unsalted butter
100g dark muscavado sugar
4 tbsp golden syrup
175g wholemeal flour
150g plain flour
1 tsp bicarbonate of soda
1 tbsp ground ginger
1/2 tsp mixed spice
1/2 tsp cinnamon

Preheat the oven to 170C. Line a couple of trays with baking paper. Put the butter, sugar and syrup in a medium saucepan and heat gently until everything is melted and smooth. Put aside.  Sift the flours, bicarb and spices together into a big bowl. Pour the melted mixture into it and stir well to combine. Dust a work surface with flour and roll the mixture out until about 5mm thick, or roll out between 2 sheets of cling film. Use a floured biscuit cutter to cut out shapes and place on the tray. Bake in batches for about 8-10 minutes - they should get slightly darker around the edges. Remove to a wire rack to cool. Make holes in them before baking with a cocktail stick if you would like to hang them and check to make sure that the holes are still open while they are hot.

Hannah's first ginger bread house - some room for improvement.

Wednesday, 21 December 2011

short and sweet...


This Christmas the lovely ladies at the Irish Food Bloggers Association are hosting a Christmas biscuit recipe swap and I was lucky enough to get the talented Yvonne at Hey Pesto as my recipe swap partner. She kindly shared one of her favorite standby's with me. Her Vanilla Shortbread Biscuits, originally taken from the BBC Good Food Magazine, was her trade and lovely biscuits they are too - worthy of any festive tea-time plate.

The classic shortbread is a very basic recipe consisting of just five ingredients: butter, flour, sugar, vanilla, and salt. Shortbread is Scottish in origin, where it has long been a traditional holiday food, served on Christmas as well as the New Year's Eve festival of Hogmanay. Although these days we eat shortbread all year round, it's still closely associated with the Christmas season, with Danish Butter Cookies and  Petticoat Tails featuring on many peoples' Christmas shopping 'must haves'.

Home baked shortbread is easy to make, cheaper and far tastier than the bought kind. It stores very well for up to a month in an airtight container, so it's definitely worth adding to your baking repertoire.

This is definitely a biscuit, dainty and delicate, not a robust cookie. It is understated and elegant, rather like the recipe donor herself and for a little biscuit, they certainly deliver a big flavour.


Vanilla Shortbread Biscuits

Ingredients
175g plain flour
50g caster sugar
100g salted butter
1 tsp vanilla extract

Method
You need a moderate oven, preheat to about 170C. Mix all the ingredients in a food processor until the mixture comes together as a dough. Roll out using icing sugar and cut into required shape(s). Bake for 7-10  mins depending on thickness – you want a light golden brown colour when cooked.


To add to Yvonne's instructions I would recommend starting with the butter at room temperature, the dough comes together much faster. If you roll the dough out between two sheets of cling film and skip the icing sugar (the thickness of a euro coin is about right for these), it cuts down on any clean up time and makes transferring your shapes to the baking sheets much easier. You will get about 24 medium sized biscuits from this quantity.

Enjoy, and remember - shortbread is for life, not just for Christmas.


Friday, 16 December 2011

last minute christmas mincemeat...


Even though Christmas is nearly upon us, it's still not too late to make your own mincemeat. If you've never made this before it is one of the simplest things to make, but also very gratifying. There is very little work involved. After some weighing, a little chopping and grating, all you need to do is stir occasionally while your house fills with the smell of Christmas-ness.

My recipe is vegetarian, nut free and best of all, there are no horrible big lumps of candied peel - my own personal idea of Christmas hell! As you are making it yourself you can, of course, put the best of everything in… muscatel raisins, golden sultanas, etc. as they really make a big difference to the finished product.

I use butter in mine, as I prefer the flavor to the traditional suet and it also makes it suitable for vegetarians. It will, however, look a little cloudy in the jar, but that will melt away on heating. I also don't include any nuts, as there are a lot of nut allergies around these days. They can be incorporated in the topping instead for those who really love them, but feel free to add some to your own. About 50g of almonds for this quantity of mincemeat is about right, making sure to toast them first to bring out all of their delicious nutty flavor. You could also use brandy or rum in place of the sherry if that's what you have.  I also use regular salted butter but if you are using unsalted remember to add a pinch of salt to the mixture.


Ingredients
175g/6oz currants
175g/6oz raisins
175g/6oz sultanas
175g/6oz glacé cherries
1 small Bramley or other cooking apple, peeled, cored and finely chopped
125g/4oz butter
225g/8oz light muscovado sugar
1/2 tsp ground cinnamon
1tsp mixed spice
Grated zest of one orange
Grated zest and juice of one lemon
200ml/7floz of good quality sherry.

Weigh out your fruits into a large pan and add in the chopped apple, zests and lemon juice, butter, sugar and spices. Allow to melt together over a low heat, then simmer very gently for about 10 minutes. When the mixture has cooled completely, stir in the sherry. Spoon the mix into sterilized jars, seal, label (with love) and store in a cool place.


This makes four jars of mince meat. Use it to make traditional mince pies to feed the hordes of hungry carol singers calling to your door.

 "But what else can I do with it?" I hear you ask… Well, you can mix up your mince pie toppings with almond meringue piped on instead of a pastry lid. Or try a simple nutty crumble topping piled over. Or festive-up your regular ice-cream with a warm dollop of mix. Or even make a bread and butter pudding with slices of plain white bread or brioche sandwiched together with a generous spread of this as a filling before pouring over your custard and baking as usual. Mmmmm!

And of course, if you pack it into a pretty jar and tie a jaunty bow, they do make lovely homemade Christmas stocking fillers.

Thursday, 1 December 2011

coconut macaroons...


My last post was for the rich and creamy ice-cream slice that, some of the more observant of you may have noticed, called for six egg yolks. I have been known on occasion to let one stray egg white go down the sink uncooked. Very occasionally I may have let two go. But six egg whites… I could not in all conscience see them wasted. What did you do with the egg  whites then, Amee? I hear you all cry in unison. Well, let me tell you what…

Two egg whites were whisked up with sugar into a roulade, baked in a swissroll tin and rolled with toffee cream and slices of caramel apple. Ta-daaah...Toffee Apple Roulade -quick, simple and dee-licious!


The other four were used in my own favorite sweet treat, Coconut Macaroons.  This is more or less the home-made version of a 'Bounty Bar', (called 'Mounds' in America, as I am reliably informed by my friend Mona - my go-to-gal for all Americana wisdom).

With a crispy exterior and a soft, chewy interior, these can be eaten warm from the oven, or dipped in milk or dark chocolate at room temperature. You will need to chill the mixture before putting it in the oven, but you can leave them overnight in the fridge before cooking and they will not suffer in the slightest.

The Coconut Macaroons store very well. They will stay wonderfully moist and chewy even after a few days in the cookie jar.


Coconut Macaroons:

4 large egg whites, at room temperature
200 g granulated white sugar
1/4 teaspoon salt
1 teaspoon pure vanilla extract
50g plain flour, sifted
10g corn flour
250g desiccated coconut

100g chocolate of choice, melted.

Place a heatproof bowl over a saucepan of simmering water, whisk together the egg whites, sugar, and salt. When this mixture is warm to the touch and nice and creamy, remove from heat and stir in the vanilla extract, flours and coconut. Cover and refrigerate for about two hours until firm, or overnight.

Preheat oven to 165 degrees C and line two baking sheets with parchment paper. 

Place small mounds (very heaped teaspoons) of the batter on the parchment-lined baking sheets, spacing them several inches apart.  Bake for about 15 to 20 minutes or until golden brown.  Remove from oven and let cool on the baking sheet for about 10 minutes and then place on a wire rack to cool. When cold, dip the flat bottoms in the melted chocolate - replace on the parchment-lined baking sheets until set then drizzle the tops of the macaroons with the remaining chocolate.

Makes about 2 dozen macaroons 


Sunday, 27 November 2011

comfort and joy...


I have always loved christmas and really start getting excited about it in September to be honest, I just wait for Holloween to be over with so I can start making plans.

It's a time for making new memories for the little people in your life. My own memories from Christmas growing up in a family of five were mostly of the fun of creeping out on Christmas morning with my brothers to see what had been delivered in the night. As in most Irish homes, the day itself revolved around the turkey which had been dangling upside-down in the cool basement with its head, wings and innards still intact. After my mother had dealt with it, the wings would be used to brush out the bottom oven of the range or fireplace for a while, while the innards would add a deep, rich flavor to the Christmas dinner gravy - but to this day I don't know what became of the head!

Dessert was always a choice of a trifle, fruit salad or yule log as standard, along with the traditional Christmas cake and pudding that had been made at the end of October. Not forgetting the mince pies in big (or so they seemed) glass jars in the corner cupboard. All very excellent Christmas Day fare. 


Now I am the 'mammy' and though tastes have changed there's still a great sense of tradition-making that I've inherited. I still make a cake and a pudding and maybe some mincemeat as well - but the demand for these types of heavily spiced confections seems to be over, and having never really liked them myself I can't miss them too much, but there's always room for invention in cooking!

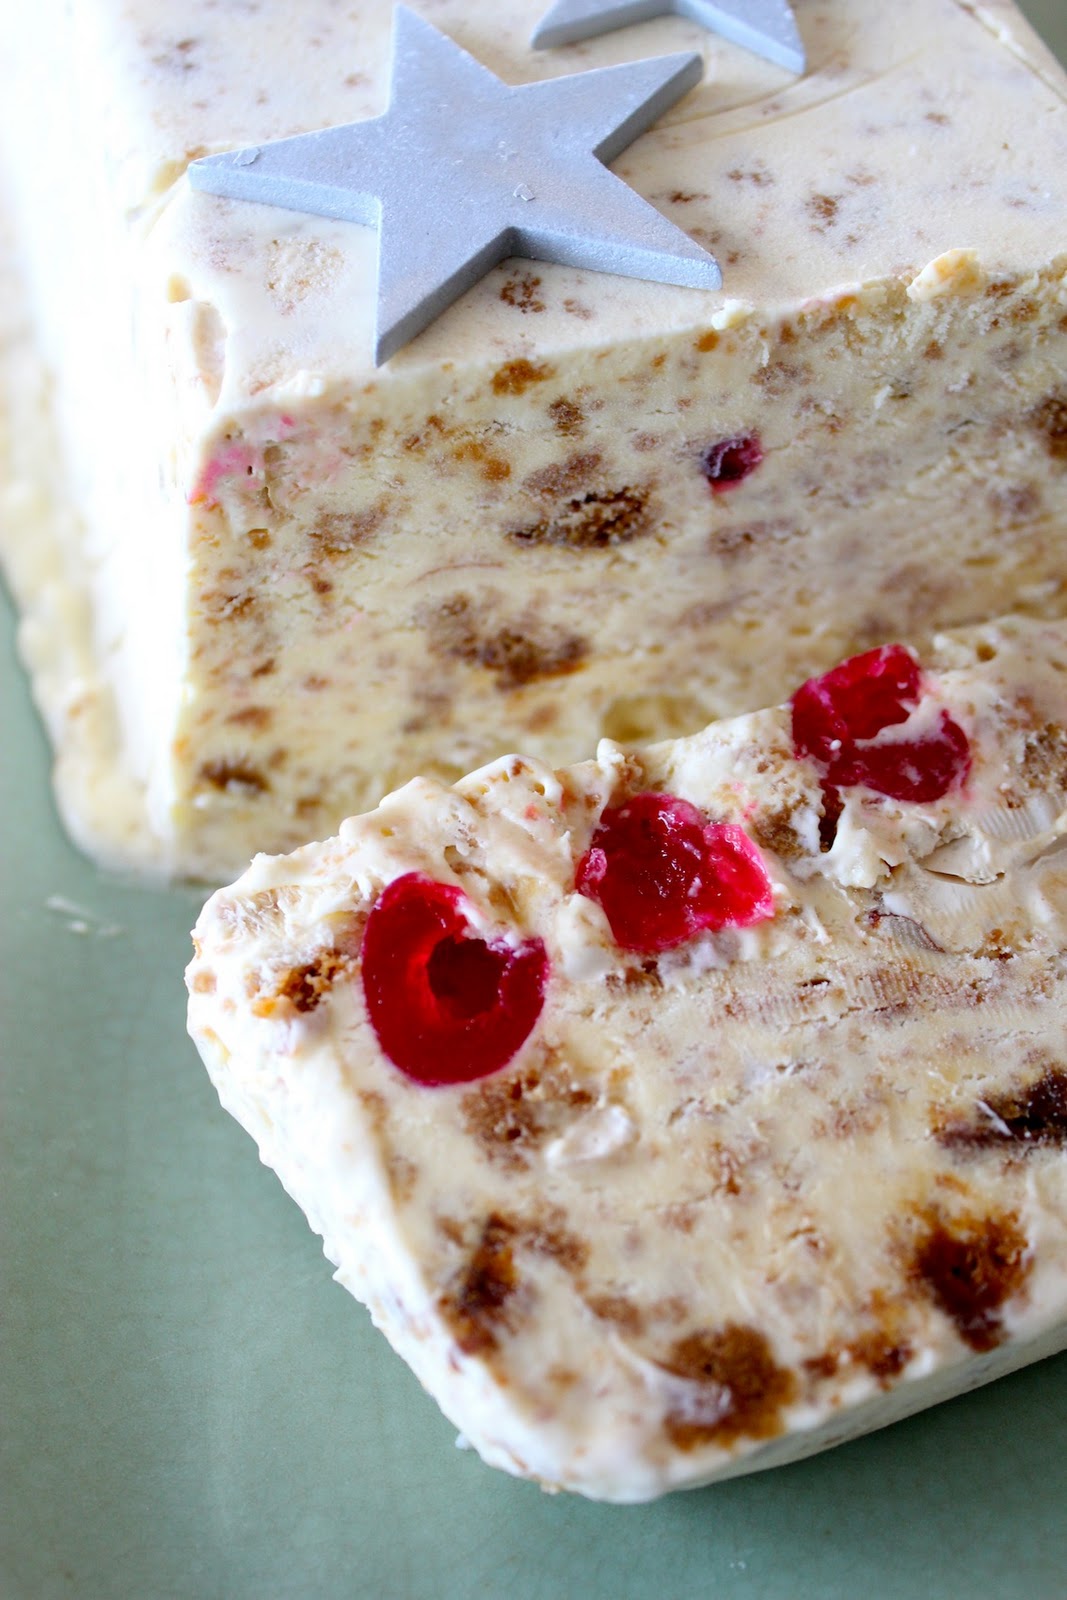
So, for the last few Christmases I have made this ice-creamy dessert for after the meal itself. It uses all the things that mean Christmas to me - ginger bread, nougat, and the red cherries (that I tell the children are reindeer noses). All of these ingredients are easily replaced by other Christmas flavors, use crumbled Christmas cake or pudding in place of the ginger cake, put handfuls of nuts and dried fruits in as well. This dessert is one that can grow with the changing tastes of your family, and the big bonus is that mine is already made and waiting in my freezer for its time to shine, leaving me plenty of time to fuss over my dinner and still look like a effortless hostess presenting my dessert with a charming flourish!

When I use cream I really like to use the double cream (which my American readers call heavy cream). It's nice to work with, more stable and far more easy to find than even a couple of years ago, when I had to go to 5 different shops to find enough of the small purple Avonmore cartons to make my dessert. 

It's light, rich and tasty and even if you think you can't manage another morsel of food, you can easily eat a slice of this and maybe check your neighbors plate to see if there might be a little piece extra left over there…


Christmas Ice-cream slice


This ice-cream will keep for up to 3 months in the freezer

180g caster sugar
6 medium egg yolks
750ml Avonmore double cream
200g ginger cake crumbled, homemade or bought 
75g glacé cherries
100g good quality nougat

Decoration can be edible silver balls, plastic Santas, small robins or whatever your heart desires!

Line a 1.5 litre loaf tin with cling film, leaving a large overlap to cover it later.

Put the sugar and 4 tablespoons of cold water in a saucepan over a low heat to dissolve your sugar.
Increase the heat, bring to the boil and cook for about 3 mins without stirring until syrupy. (If you have a sugar thermometer this is will read just below soft boil) Take the pan from the heat, beat the eggs with a electric whisk until pale and thickened. Add the hot sugar syrup very gradually, whisking all the while so that the eggs don't curdle, until you have a thick mixture. Keep whisking until it has cooled.

In another bowl whisk the cream into soft peaks. Fold half of the cream into the egg mixture and the into the other half add your crumbled cake of choice. Fold the two halves in together with your cherries and nougat. Spoon into your prepared tin, level the top and fold over the cling film. Freeze for 6 hours or over night. Turn out onto a pretty plate - discarding the cling film, decorate to your liking and cut into slices with a knife heated in a jug of hot water.