expr:class='"loading" + data:blog.mobileClass'>
Showing posts with label Economy. Show all posts

Wednesday, 13 February 2013

Miss Havishams Valentines Cookies...


Rich dark chocolate biscuits with sweet fondant icing


Valentine's Day is just around the corner, but not everyone is looking forward to its arrival. I personally am not a huge fan of all the pink, red, glitter and giant stuffed animal clutching fluffy hearts with embroidered messages of undying love.

Indulge your own bitter heart with these gothic valentines cookies to mark the day, Miss Havisham style. Put on your old wedding dress and eat these in your decaying mansion. They will be a lot tastier than your dusty old wedding cake, all the time being careful to stay away from naked flames.


Ingredients
50g unsalted butter (3 1/2 tbsp)
50g soft light brown sugar (4 tbsp packed)
1 TBS golden syrup
110g plain flour (1 cup plus 1 3/4 tbsp)
20g cocoa powder (not the drink mix, scant 3 tbsp)
(I used Cadbury's Bournville cocoa powder)
pinch salt
1/2 tsp bicarbonate of soda
1 to 2 tsp milk
Rollable fondant icing to decorate.
A little icing sugar and water mixed together to make a paste.


Preheat the oven to 150*C/300*F/ gas mark 3. Line a baking sheet with baking parchment paper. Set aside.

Cream together the butter and brown sugar until light and fluffy. Beat in the golden syrup until smooth. Whisk the flour, cocoa powder, salt and soda together in a beaker. Sift this into the creamed mixture. Add the milk a bit at a time, until you get a soft even dough. It should be a bit crumbly, but be just coming together. Tip out onto a lightly floured surface or onto a large piece of cling film and press until it comes completely together.

Roll out with a lightly floured rolling pin about 1/4 inch thick. (I rolled mine out between two sheets of cling film so that I did not have to use a lot of flour.) Cut out into shapes, heart or others. Carefully lift onto the prepared baking sheet with a metal spatula, leaving some space in between the biscuits.

Bake for 8 to 10 minutes, then remove from the oven. Carefully lift onto a wire rack to cool completely. Roll out the fondant icing very thinly and cut into similar, slightly smaller piece of fondant icing. Stick the fondant to the biscuit with the icing sugar paste and leave to dry. Paint, stencil or stamp cold, black hearts onto each cookie or decorate as desired. Fester in your own unhappiness or plot your revenge, while enjoying the biscuits with a nice cup of tea.


Friday, 8 February 2013

say it with flowers...


Creamy Butterscotch Flowerpots

Valentine's is a day for lovehearts and flowers... and sweet treats to eat. My days of exchanging cards are well behind me, but the two small budding romantics in the house like to mark the occasion. I made these sweet little pudding pots for one of the girls birthday party last year and have been requested to provide them again for a flowery Valentines dessert. They are delicious and easy enough for even small children to do much of the work. A layer of chocolatey cake covered in creamy butterscotch mousse and topped off in more crumbled chocolate cake, my kind of gardening.


I prefer to use Avonmore  Double Cream. This is the equivalent of what you lovely American visitors call 'heavy' cream. In general when you are whipping the cream, it will whip better if you add a pinch of salt and when sweetening whipped cream, adding the sugar when the cream is mostly whipped will trap more air in and get you a higher volume. Adding the sugar at the beginning results in lower volume.

This is the chocolate cake recipe I used but any chocolate cake will do - even shop bought. You can also use crushed Oreos, just throw them in a food processor and pulse until they look like sand.

You will need some very small flowerpots (ceramic or plastic) straws, and fresh cut flowers. Also some jelly worms to aerate the soil, very important. Snip the straws so that they are about 1/2 to 1 inch shorter than the top of the pots

Ingredients for the pudding
75 gram(s) butter
100 gram(s) brown sugar
300 ml Avonmore Double Cream
2 egg white(s)
2 teaspoon(s) caster sugar


Method
Combine butter, brown sugar and 100ml of the cream in a small saucepan over medium heat and stir until sugar dissolves; set aside to cool. Whisk remaining cream to soft peaks and fold into cooled butterscotch mixture. Whisk egg whites and caster sugar to soft peaks. Fold meringue into cream and butterscotch mixture, then divide between 6 flower pots (or serving glasses, dishes). Refrigerate until needed.

Then simply fill the ends of your pots with chocolate cake put a layer of pudding next with a straw in the centre to hold the flower, I made mine when I had lots of sweet peas so those are I used, but anything from the garden is fine. I do recommend a quick google search to make sure your choice of flower is not highly toxic and remember to tell the children not to eat the flowers. Put plenty of worms, boys especially like them, mine were from the Natural Jelly Company. Top off the pots with your crumbled chocolate cake. Refrigerate until needed, popping the flowers into their straw holders just before serving. Happy Valentines day :)

Sunday, 3 February 2013

pecan pie muffins...


Pecan pie is one of our favorite desserts. But it uses a heck of a lot of maple syrup and pecans and is a bit of a faff to make unless it's for a special occasion. So here is the next best thing, Pecan Pie muffins. 18 - 20 mini muffins or 10 - 12 regular sized. I prefer them warm from the oven with a little scoop of vanilla ice-cream and without the frosting, but the kids like them with the frosting. Grease and flour the muffin tins well if you are not using lining paper as these can stick quite badly. 


Ingredients for the Pecan Muffins
110g/1 cup chopped pecans
120g/1/2 cup all-purpose flour
240g brown sugar or 1 cup packed brown sugar
160g/2/3 cup butter, melted
2 eggs

Preheat oven to 350 degrees F (175 degrees C). Butter a muffin or mini-muffin tin or use paper muffin liners. In a medium bowl, stir together brown sugar, flour and pecans. In a separate bowl beat the butter and eggs together until smooth, stir into the dry ingredients until just combined. Spoon the batter into the prepared muffin cups. Fill each 3/4 full and bake in the preheated oven for approx 15 - 20 minutes depending on size. Cool on wire racks when done.


Ingredients for the Maple Buttercream
250g of butter, 
500g icing sugar
2 tsp maple syrup
Make sure your butter is soft, pop into a bowl. Add your icing sugar & start to mix on a low speed. Once your icing starts to come together increase the speed to medium. Leave for about 10 mins on med-high speed or until it looks like whipped cream, then fold in the maple syrup.

When the muffins are cold, spoon or pipe the frosting on, drizzle with a little maple syrup and scatter a few toasted pecans on top for prettiness.


Tuesday, 29 January 2013

emergency tomato soup


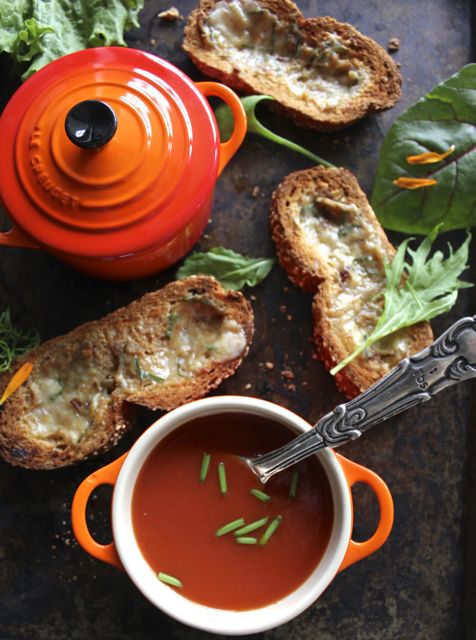
Very quick emergency tomato soup with garlic & cheese croutons.

You will never go hungry if you have a few tins of tomatoes in the larder. This quick meal can be made in ten minutes when you have little time to cook and seemingly nothing in the fridge. A little bit of toasted bread makes it more substantial and with a little roast garlic and talegio compound butter from the freezer melted on top it transforms into a feast.


Ingredients:
400 gr can of cherry tomatoes
100 ml beef stock or vegetable stock
A few drips of tabasco
Some Worcestershire sauce, a tablespoon or so
1 tsp sugar
Chives, basil or a few rocket leaves to garnish
Salt & pepper
Creme fraiche (optional)

Method:
Empty the tin of tomatoes into a saucepan. Add a splash of worcestershire sauce, the sugar and seasoning and a few drops of tabasco to taste. Add the stock and bring to the boil for a minute or two. Then either puree with a stickblender till smooth or pass through a sieve. Ladel into bowls and garnish with some fresh herbs and creme fraiche (if using) and serve with toasted crusty bread.


Thursday, 17 January 2013

I'm so hungry I could eat a horse...


What a hullabaloo - horse meat in the burgers no less. But why are people buying frozen burgers of questionable origin when it couldn't be simpler to make your own from lovely Irish beef. Buy your meat from a good butchers or even the supermarket, there are not many horses trotting through either. You can buy premium steak mince but the cheaper stuff is also nice and the extra fat keeps it lovely and juicy. But the real secret to a really, really great burger is a splash of fish sauce. You know the stuff, smells disgusting and fetid, it is made from elderly anchovies after all, but its pure umami brings out the savory depth in foods and will make the best burger you will ever taste. So here's what to do.


Burgers
2 lbs minced beef
1 1/2 tablespoons Fish Sauce
1 egg
1 teaspoon fresh ground Black Pepper

Burger sauce
4fl oz good quality tomato ketchup
2 tbsp mayonnaise
1 1/2 tbsp lemon juice
1 tsp sweet paprika
A good few drops of hot sauce or tabasco

Other stuff
4 tbsp olive oil
2 large red onions
2 large handfuls of crispy lettuce leaves
2 juicy tomatos, sliced
4 gherkins sliced thinly
6 slices of cheese
6 plain wholemeal rolls or sesame buns


Directions:
In a bowl, combine all burger ingredients together, smushing the beef with your hands. Leave to sit for 20 minutes. Shape into a balls and then flatten into burger patties.

While the burger mix is resting, caramelize your onions by slicing them very finely and then cooking them in  3 tbsp of the olive oil over a low heat in a heavy based, non-stick pan. The onions take around 15-20 minutes to caramelize properly but it's worth it. Cook until golden, sticky and just starting to get a little crispy and then add a pinch of salt.

In between watching the onions, mix together the ingredients for the sauce, adding the hot sauce at the end cautiously and tasting after every drop or two until your preferred level of 'zing' is reached.

Put the bread into the oven to warm while you cook the meat patties in a non-stick pan with a little olive oil over high heat, for a couple of minutes each side. Don't fry them slowly or they will get tough and loose all their juicy-ness. Pile on the lettuce, gherkin and fresh tomato, add the hot beef patty and top with the cheese so that it melts deliciously on top. Use your favorite cheese but I like processed sliced cheese for a proper melty cheese burger experience. Feel free to mix it up with any other condiments of your choice, I like a few jalapenos sometimes or maybe some beetroot if you are a lovely Australian. Then the caramelized onions and pink burger sauce. Pure beefy perfection.

This makes quite a lot of big, meaty burgers, I often make them quite a bit smaller especially if I am serving them with chips and salad and shape the left over meat mixture into walnut sized balls which I freeze or put covered in the fridge and cook the next day in a tomato and basil sauce for a second dish of Italian style meatballs

And there you have it. Delicious, juicy, healthy burgers, without a trace of 'my Lidl pony' in sight.

Sunday, 13 January 2013

roast garlic & talegio bread...


Garlic butter is a compound butter, basically a 'flavoured' butter. These butters are endlessly versatile. A flavored butter acts as a sauce, in essence and any flavoring can be added. Chopped herbs with lemon zest will go great with fish or red wine and shallots with steak for example.

Now, I have never met a cheese I did not like, but Talegio is one (from a very long list) of the cheeses that I love. A compound butter made with Talegio is a glorious thing. It is quite a strong smelling cheese, but its flavour is comparatively mild with a sweet tang to it. When heated, it loses most of its strong smell and is just sweet and salty and delicious. If you can't find any then Fontina is a reasonable substitution and a ripe Brie would do if you were stuck.


Roasting the garlic first gives you loads of garlic flavor without the harshness of raw garlic, and it is delicious on toast as well. You could just add some sliced parma ham, dressed rocket, a nice bottle of red wine and you'd have a one of my favorite easy suppers for two. 

I always make plenty of this butter as it freezes very well, and I do it in small batches. Then whenever you have limited time to make a meal, take some chicken breasts or a pork chop, add this on top and simply bake in the oven for a quick meal with some salad or steamed veg. Or cook some wide ribbon pasta like tagliatelli and toss through a spoon or two in the hot pan pan, finish with some basil and you have a mac and cheese for grown-ups. 


Ingredients
1 head of garlic
300g Talegio cheese – softened
200g butter – softened
1 bunch chives – chopped
Sea salt and cracked clack pepper
1 sourdough loaf - a day or two old.

Method
Roast the garlic first. Preheat the oven to 170ºC. Cut a garlic head in half around the middle and wrap in aluminum foil and put it into the preheated oven. Cook for an hour or so. When done, you'll find the garlic cloves have turned into a soft, fragrant and caramelized mass, that will practically jump out of its papery case. Just squeeze the garlic flesh out or remove with a fork. 

Remove the rind from the Talegio, cut into chunks and mix with the butter and chives. Season liberally with pepper and sparingly with salt. Empty all the garlic flesh into the cheese and butter mix, then mash it around with a fork a little. C'est tout. 

Cut slices vertically into the bread and stuff full to bursting with the butter mix. Wrap tightly in aluminum foil and bake in a hot oven (about 200ºC) for 20 minutes. Remove, unwrap and serve immediately.


Tuesday, 4 December 2012

christmas rocky road squares


These are plain old rocky road squares with the seasonal adjustment of red glace cherries. The ones pictured here are missing their nuts as they were destined for a school party. These can be made ahead and store in an airtight container in a cool place for up to 1 week. Decorate with icing sugar up to 2 hours before serving. Make the Rocky Road as above and freeze for up to a month. Thaw overnight in a cool place and decorate.


Ingredients
250g dark chocolate
150g milk chocolate
175g butter
4 tbsp golden syrup
200g Rich Tea biscuits
150g toasted hazelnuts
150g glace cherries (red)
125 g mini marshmallows
1 tbsp icing sugar
Edible things for decorating

Method
Chop both sorts of chocolate small and then put into a heavy-based pan to melt with the butter and syrup over a gentle heat. Put the biscuits into a freezer bag and bash them with a rolling pin to get big- and little-sized crumbs; you want some pieces to crunch and some sandy rubble. Put the nuts into another freezer bag and also bash them so you get different-sized nut rubble. Take the pan off the heat, and add the crushed biscuits and nuts, whole glacĂ© cherries and mini-marshmallows. Turn carefully to coat everything with syrupy chocolate. Tip into a foil tray (I use one 236mm x 296mm), smoothing the top as best you can, although it will look bumpy. Refrigerate until firm enough to cut, which will take about 1 1/2–2 hours. Then take the set block of rocky road out of the foil tray ready to cut. Sieve the icing sugar to dust the top of the Rocky Road. With the long side in front of you, cut into it 6 slices down and 4 across, so that you have 24 almost-squares. Top with festive things, edible or plastic, taking care not to eat the plastic ones.

Adapted from Nigella Christmas


Saturday, 17 November 2012

Home-made fish fingers


Home-made fish fingers have more fish, more flavour and more crunch than shop bought ones and are well worth the extra effort. Most children love them so they're a safe bet when they have a few pals over after school. I always make up some extra and freeze them. They make a brilliant midweek emergency supper, frying them in batches from frozen.

Serve them with crispy homemade oven chips, or between two slices of bread with loads of tartare sauce for the ultimate fish finger sandwich. I have lemon sole here but any white fish like cod or haddock would do just as well. Sustainable white fish, such as pollock or coley would be even better. Panko breadcrumbs give the nicest coating, but I nearly always have breadcrumbs in the freezer so that's normally what I use - either is a vast improvement on the bright orange coating of the boxed fish finger - sorry Captain Birdseye, no offense intended.


Ingredients
2 lemon sole fillets (skinned)
70 g cornflour
100 g white breadcrumbs (or panko)
2 eggs
250 ml groundnut oil (or grapeseed - or as needed depending on size of pan)
Salt & pepper (to taste)

Method
Cut the fish into strips down the fillet, following the natural lines of the fish. The strips should be approximately 1in wide and 3-4in long. Sprinkle some salt onto the fish.
Put the cornflour into a shallow bowl and season with salt and pepper. Put the breadcrumbs or panko into another shallow bowl, and beat the eggs in an additional bowl.
Dip each finger into the seasoned cornflour, coating it well, then the beaten egg, and finally the breadcrumbs.
Lay the coated fish on a cooling rack for a while, and heat the oil in a pan. (Or at this point you can freeze them in layers of baking parchment in an airtight container.)
Fry the fish fingers for about 2 minutes, or until crisp and golden. Remove to pieces of kitchen paper as you go, to get rid of excess oil.


Friday, 26 October 2012

pumpkin cauldron soup...


Oh, fruit loved of boyhood! the old days recalling, 
When wood-grapes were purpling and brown nuts were falling! 
When wild, ugly faces we carved in its skin, 
Glaring out through the dark with a candle within!


We have a lot to thank the Americans for over here on the our little Island. You could say we owe them. They have taken our drunken St Patricks day ritual to heart, they send tourists over here in droves, and without them there would be nothing on the telly. Best of all they have given us the pumpkin, God bless America.


Ingredients
 1 pumpkin, about 20cm diameter
 25g butter
 1 onion, sliced
 1 garlic clove, crushed
 freshly grated nutmeg
 2 tablespoons chopped fresh sage
 1 litre hot chicken stock
 3 tablespoons cream
 about 100g emmenthal or other melting cheese
some chives to garnish

Method
Heat the oven to 190ºC (170ºC fan oven) gas mark 5. Slice off the top of the pumpkin to make a lid and set aside. Scrape out the fibrous strands and seeds. Put the pumpkin in a lightly oiled, deep roasting dish.
Cut away the flesh inside, leaving walls thick enough to hold soup. (an ice-cream scoop works well for this task) Chop the flesh.
Heat the butter in a pan and gently fry the onion for 10 minutes until softened. Add the garlic and cook for 1 minute. Stir in the nutmeg, sage and reserved pumpkin flesh.
Put the mixture in the shell and pour in the stock. Season and cover with the lid. Cook for 45 minutes to 1 hour till the pumpkin is tender but still holds its shape. Stir in the cream; garnish with chives and extra cheese.

Carefully remove from the oven and bring the pumpkin to the table. Ladle the soup into bowls to serve.


Sunday, 21 October 2012

chicken noodle soup


It's that time of year again, ladies. The time of year when the rare strain of flu takes hold, so powerful and so deadly, it can only be compared to the Ebola virus. This virus is highly specialised and only attacks the "XY" gene found in men. A disease so potent it impacts their fragile immune system 100 percent harder than the average flu virus, causing excruciating pain for the poor lads. While women cannot contract the virus, we can alleviate the symptoms with sympathy and soup. This soup is the most powerful weapon in my armory at this difficult time. And the sympathy? Not so much…


Chicken noodle soup, good for what ails you.

1 tablespoon vegetable oil
1 large onion, chopped
1 chicken jointed or 3 pounds chicken pieces of your choice
2 ltrs water
2 tbs soy sauce
Freshly ground black pepper
1 large carrot, sliced diagonal
Handful of sweetcorn, tinned or cut from the cob
Spring onion sliced diagonally
3 ounces dried egg noodles or linguini
1 tablespoon chopped flat-leaf parsley or some extra spring onions to garnish

Serves 4


Prepare broth: In a large heavy sauce pan, heat the vegetable oil on a medium heat. Add the onion and saute it for 3 to 4 minutes, until it starts to colour. Add the chicken pieces (if too crowded, you can do this in two batches), making sure the chicken parts touch the bottom of the pan directly. Cook chicken until lightly browned, about 10 minutes.

Add water, soy and some freshly ground black pepper and bring the mixture to a boil. Reduce the heat to a gentle simmer for about 20 minutes.

Transfer chicken to a plate to cool enough to handle. Strain the liquid through a sieve return the broth to the pot and bring back to a simmer. If you want a fat-free soup cool and refrigerate the broth at this point and take the solidified fat from the top before continuing. 

To finish and serve: Add diced vegetables and simmer them until they’re tender, about 5 minutes. Add dried noodles and cook them according to package directions, usually 6 or 7 minutes. While these simmer, remove the skin and chop the flesh from a couple pieces of chicken. The remaining parts can be slipped into an airtight bag in the fridge and used for sandwiches, in salad or savory pie over the next few days.

Once noodles have cooked, add chicken pieces just until they have warmed through (30 seconds) and ladle into serving bowls. Garnish with parsley or spring onion and deliver to your brave, brave soldier.


Tuesday, 16 October 2012

street food, galway


As with everything else in life, food has its fashions and trends, ups and downs, ins and outs. Have you been wondering what's replacing cupcakes? Is your sushi lunch passé?

2012 continued to see a return to frugal foods and cheaper cuts. Molecular cooking is on the wane while Scandinavian-style foraging and the 'Nordic pantry' is still going strong. Argentinian alfajores were all set to replace macarons. Pie-pops, miniature pies on sticks are the successor of the cake-pop. Fin-to-Tail eating is the new nose to tail and blessed are the cheesemakers, the new mixologists.

Scotch eggs got a revival and revamp. Complicated pizza toppings were cast aside, chicken thighs are the new breast and lamb is the new pork. There was talk of 24-hour baguette dispensers, ceviche, edible dirt and pork scratchings. Homemade dairy is hot on the food blogs right now - everyone is making their own ricottas and goats cheese, and what do you mean you don't make your own butter and yogurt? Shame on you, madam.

Food trucks are replacing gourmet delis and specialty stores, tweeting their locations as they go. Street food is one of the big trends for a few years now and shows no sign of slowing down any time soon. It's nothing new in Galway of course. The street has been our dining room for as long as we have had an open air market.

There's a great variety of food available, madras curry, delicious sweet and savory crepes, Japanese sushi and more. The best are specialists – they do a few dishes, and they do them very well. If I had to pick a favorite it would be Boychik Donuts, made to order right in front of you. These are the freshest donuts you'll ever taste - fluffy, hot and tossed in sugar and cinnamon, eaten straight from your hand, these donuts may well be the new cupcake.


Thursday, 11 October 2012

pea & ham soup


Beautiful soup, so rich and green,
Waiting in a hot tureen!
Who for such dainties would not stoop?
Soup of the evening, beautiful Soup!


When a chicken is roasted, as it is often on a Sunday in this house, the bones always go to make a beautiful, deeply savory stock and not a scrap of meat is wasted. Home made chicken stock is a great thing to have stashed away in the freezer for soups and stews. My friend and Twitter buddy Catriona over at Wholesome.ie recently gave a lovely recipe for noodle soup made from the remains of her sunday roast. Similarly when I cook a ham or gammon I wouldn't dream of throwing away the cooking liquid. The ham itself is usually for a pie with chicken and mushrooms, or for good old bacon and cabbage. If you buy one bigger than you need it's the best way of having quality meat for sandwiches. The children are not keen on wet, slimy packet ham and neither am I.

Ham hocks are the cheapest way of all to make a nice ham stock and when I get one of those I nearly always use it to make my favorite pea and ham soup. The recipe gives the instructions for the stock from scratch using a ham hock - if you are cooking a ham it is probably worth bringing it to the boil first in a pot of water and then changing the water to take out some of the salt and proceeding with adding the rest of the ingredients from there.  This recipe started life as Heston Blumenthal's from the menu at The Hinds Head. He insists on frozen peas for this as they are frozen within minutes of being picked, preserving the intensity of the flavour.


For the stock
1 ham hock
1 small onion, halved
1 celery stalk, very roughly chopped
1 large carrot, very roughly chopped
1 large leek, white part only, halved
1 garlic clove, crushed
1 bay leaf
4 or 5 sprigs of thyme
4 or five black peppercorns
2L water

For the soup
50g butter
200g shallots, sliced
75g pancetta
500g frozen peas
a clove of garlic
Extra virgin olive oil
Freshly ground black pepper

Put the ham hock in a very large pan with 2 litres water and bring to the boil with the rest of the stock ingredients. Reduce the heat the heat and simmer gently, uncovered for two and a half hours until the ham hock is cooked. Remove from the heat and leave to cool then strain the stock through a sieve keeping the hock to one side.

For the soup heat the butter in a large pan add the sliced shallots pancetta and garlic and sweat for 10-15 mins until the shallots are tender add the peas and stock bring to the boil and puree in a liquidiser. pass through a sieve into a clean pot. Bring back to the boil and correct the seasoning. If the soup is too thick add a little water until it is at the desired consistency. Flake the meat from the ham hock and stir into the smooth soup. you can garnish with a few extra whole peas or some fried and crumbled bacon or a leaf or two of aromatic mint.


Tuesday, 9 October 2012

banana cream pie


The big, generous, family pie is something the Americans do best. Deep dish fruit pies stuffed full of apples or cherries. Smooth pumpkin or crunchy pecan pie, rich and decadent peanut butter or Mississippi mud pie. This one is my current favorite and possibly the easiest of the lot - the banana cream pie.

It is not an sophisticated dessert by any means, ripe bananas hiding in a smooth thick custard, but it is very good - I most often make mine on a sweet shortcrust pastry, but a packet of plain shortbread or another plain biscuit or cookie makes it even easier as you won't even have to turn the oven on. This is a favorite with children and people with ill-fitting dentures.


American banana cream pie

For the base
250g plain flour
125g butter, chilled, chopped
75 g caster sugar
1 egg yolk
1 tablespoon chilled water

For the filling
500ml milk
250ml cream
1 tin (approx 250ml) condensed milk
1 tsp vanilla extract
4 tbsp cornflour
4 egg yolks
3 large bananas, roughly chopped

For the topping
2 large bananas, thinly sliced
approximately 500ml whipped cream
a little grated chocolate if liked


Make the base:  For the sweet pastry base combine flour, butter and sugar in a food processor. Process until mixture resembles fine breadcrumbs. Add yolk and chilled water. Process until dough just comes together. Turn pastry onto a lightly floured surface. Knead until just smooth. Wrap in cling film and refrigerate for 30 minutes.

Preheat oven to 200°C. Roll out the pastry on a lightly floured surface to about a 3mm-thick disc. Line a round 23cm tart tin, with removable base or pie dish  with pastry and trim any excess. Place in the fridge for a further 15 minutes to rest.

Cover the pastry base with baking paper and fill with ceramic baking beans, rice or dried beans. Place on a baking tray and bake in preheated oven for 10 minutes. Remove the paper and pastry weights, rice or beans, and bake for a further 10 minutes or until golden. Remove from oven.

(For a biscuit base place a medium packet of biscuits in a food processor. Process until they are completely broken up and there are no big lumps visible. Place in the bottom of a deep pie dish between  10" - 12". mix in 2 tablespoons of melted butter, press down with the back of a spoon to line the base and refridgerate for 30 mins.)

Make the filling: Bring the milk, cream, condensed milk and vanilla to a boil. Meanwhile, whisk together the cornflour and egg yolks. When the milk mixture is hot, spoon some of it onto the egg yolk mixture and whisk well. Pour the egg yolks back in the pot and allow to heat slowly while stirring constantly until the mixture becomes very thick - just a couple of minuets should do it.

Mix in the chopped bananas and pour onto the biscuits or pastry shell. Push down any bananas near the top as they will discolour if they are too close to the surface. Place a piece of cling wrap directly on the surface to prevent a skin from forming and put it in the fridge for 2-3 hours until set.

To serve: Remove the cling wrap, dollop the whipped cream on top, arrange the sliced bananas on the pie. grate some chocolate over (if desired) and serve maybe with a little drizzle of maple syrup.


Thursday, 26 April 2012

irish onion soup...


French onion soup made properly is a joy. But, this is not French onion soup. This one has an Irish accent and is all the better for it.


The most important element to a good onion soup is the proper caramelisation of the onions. Caramelising onions take at least thirty minutes of slow cooking of the onions over a medium high heat. This browning brings out the sweetness in them and that's what makes this soup so good. The chicken stock and cider give it a lighter finish than the traditional French version which usually lists beef stock and Cognac among its ingredients, but at the end of the day, it's just a different kind of delicious.

It's the bog-standard brown onions you want here, red onions will go a sickly grey colour as they cook. Thinly slicing the onions is a doddle if you do it with the shredding attachment of a food processor.


Ingredients
50g butter
1kg brown onions, thinly sliced
2 tbsp picked leaves of thyme
200ml Irish cider (MacIvors or another artisan cider is ideal)
Chicken stock fresh, cube or concentrate made up to 1.2 litres

1 nice sourdough or baguette, sliced
1 garlic clove, halved
Extra-virgin olive oil
100g Mossfield or other hard Irish Cheese, grated


Method
Heat the butter in a large pan and gently cook the onion and thyme until the onion is softened but not browned. This might take up to thirty minutes. Increase the heat slightly and cook for another 15 minutes, stirring now and again to stop them catching, until the onion becomes dark golden, sticky and caramelised. Add the cider and simmer for 2-3 minutes, then add the stock and bring to the boil. Season. Simmer for 10 minutes.

While that's simmering, toast the bread, rub each slice with garlic, then drizzle with a little oil. Sprinkle with the cheese and grill until golden and bubbling. Serve the soup with the cheese croutons on top.

Thursday, 23 February 2012

hazelnut & buttermilk banana loaf...


I have written of banana bread here before. This butter-less banana bread is the nutty type and easier again if such a thing is possible... and with minimum washing up, my favorite kind of loaf! It's what to make when you are being badgered into baking something but don't want to spend the rest of the evening cleaning up after it. If you have children over the age of three they can also do a lot of the work themselves, which is fair, as it is they who have done the badgering.

As with all banana bread, the very best bananas to use are the kind that are so old and blackened that they look like they have been in a house fire. The buttermilk keeps this very moist and can be replaced with natural or hazelnut yogurt in a pinch. The hazelnuts are best toasted before being added to the mix. It is not essential but it does release their inner nuttiness.


Ingredients
2 eggs
80 ml buttermilk
120 ml vegetable oil
225 g mashed bananas (about two large ones)
300 g golden caster sugar
220 g all-purpose flour
1 tsp vanilla essence
1 tsp baking soda
1/2 tsp salt
55 g chopped hazelnuts (toasted)


Directions
Preheat oven to 165 degrees C. Grease one 9x5 inch loaf pan. In a large bowl mash the bananas. Add the buttermilk, vanilla and oil, beat in the eggs. Stir in the sugar. Sift the flour, baking soda and salt onto the mix and mix well. Finally stir in the hazelnuts and pour into prepared loaf pan. Bake for one hour and twenty minutes or until a skewer inserted in the center comes out clean. Cool and serve with a spoon of cream, unsweetened as this is quite a sweet loaf. A drizzle of icing or syrup, a few banana chips and hazelnuts for extra crunch.


Wednesday, 15 February 2012

scrummy sausage rolls...


This is a post about sausage rolls and how to make them extra tasty. Before I go any further I feel I must say in my defence, that it is quite difficult to photograph a sausage without it looking a bit rude. That is all.


Has anyone ever found a decent commercially-made sausage roll? Not me anyway. A recipe that calls for only a few ingredients must have the best, and that just never happens with the commercial type. Cheap puff pastry and low grade pork filling just don't cut the mustard (I also like to add mustard).

The sausage itself must be excellent. If you are lucky enough to have a butcher who makes pork sausages, those will do nicely. There are a lot of high quality sausages available now. I recently met the happy pork folk over at Oldfarm, Margaret and Alfie. Margaret told me the story of how 'Pigs happened to her'. How careless to let pigs take over one's home like that, I thought. But how clever of her to convert them to porky delights and sell them to the sausage eaters that haunt Twitter Land. I shall be having some of those for myself soon I hope. But until then I buy the best quality sausages with the highest pork content that I can find.

I prefer to use a whole sausage as the texture is usually better than sausage meat, add some favourite herbs if you like, sage or thyme are always good with pork. The puff pastry you can make yourself if you have nothing for doing, but I usually buy it. A nice tomato based chutney is ideal for the filling, I use one from Rua in Castlebar which is the chutney you would make if you were making some yourself. Mustard, sharp and smooth. Cheese, piquant and melty. All rolled together and baked until puffed up and golden, great for a quick lunch with a little salad and some extra chutney on the side.

The cutting down the middle and filling comes from my mother who had picked up some very strange habits in boarding school, but that is a story for another day.


Ingredients
A packet of ready-made puff pastry (all-butter)
8 - 12 herbed sausages sliced length-way down the centre
Smooth mustard
1oz cheddar cheese
A couple of tablespoons of good quality chutney
1 free-range egg, beaten
Salt and freshly ground black pepper
Small handful of fresh thyme/sage leaves (optional)

Method
Preheat the oven to 200C/400F/Gas 6.

Roll the pastry out (if not the pre-rolled sort) on a floured surface to a rectangle and cut in half lengthways. Paint one side of the pastry with the mustard.

Lay the sausages along both pieces of pastry and season with salt and freshly ground black pepper and sprinkle with herbs. Cut your pastry to best fit your sausages. Spread the chutney and cheese generously into the cut down the centers. Roll the sausage up in the pastry to enclose.

Brush with the beaten egg and bake in the oven for about 30 minutes, leave to cool slightly before snarfing.