Showing posts with label Savory. Show all posts
Monday, 11 February 2013
savory crispy pancakes...
Shrove Tuesday takes place 47 days before Easter Sunday. Because the date of Easter Sunday is dictated by the cycles of the moon, Pancake Day can occur anytime between February 3 and March 9. In 2013 it takes place on February 12 and I shall be making these crispy pancakes, an homage to the industrial foods that filled many an Irish childhood.
I was burdened for most of my young life by a mother who insisted on making every thing from scratch. As much as we kids wanted the shop-bought cakes, pizzas and convenience foods, we were forced to endure home made birthday cakes, bread and even yoghurt. Nowadays, my children are faced with the same problem, a cruel mother who denies them all the delicacies of the freezer section of the supermarket or the Disney-endorsed Petit Filous. As it turns out, the only thing that myself and the children missed out on was vast amounts of suspicious meats - horse, donkey, possum, bat or whatever they have been passing off as beef all this time.
So this Mardi Gras will be marked by a homemade version of the positively revolting Findus classic - the savory crispy pancake. These I remember used to come in a minced beef and onion or chicken and sweetcorn flavor. I think there is a cheese variety and there was a curry one also, now defunct. There was some talk a few years ago of a lobster thermidor flavor which, if it ever happened, would be a terrible waste of lobster. We made it with a chicken and sweetcorn filling and it was a big hit. I won't lie to you, although it's incredibly easy to make, it's not particularly time consuming and you will probably dirty every plate and pan in the kitchen. But as special treat, it's hard to beat. A spoon of leftover bolognaise sauce would also be delicious but I think I will try a ham and cheese version tomorrow. (Ham from a pig!)
For the pancakes
165g plain flour
Pinch of salt
1 small egg
About 300ml whole milk
Sunflower oil for frying
For the chicken and sweetcorn filling
25g butter
25g plain flour
250ml hot chicken stock
Kernels sliced from 1 cob of corn
2 chicken breasts, thinly sliced
6 rashers streaky bacon, diced
1 garlic clove, finely chopped
1 tsp chopped rosemary
1 tsp chopped thyme
Salt and freshly ground black pepper
For the final assembly
6 tbsp plain flour
Salt and freshly ground black pepper
2 large eggs, lightly beaten
200g fine white breadcrumbs
A little paprika (optional)
A little turmeric (optional)
Sunflower oil, for frying
For the pancakes, put the flour and salt in a bowl. Break the egg into the centre, then start whisking it into the flour, gradually incorporating the milk. Keep adding milk and whisking until you have a smooth batter the consistency of single cream. Rest the batter in the fridge for 30 minutes.
For the chicken and sweetcorn filling, first melt the butter in a small pan over a medium heat. Stir in the flour to make a roux, then cook this gently for two minutes. Remove from the heat, add a good splash of the hot stock and beat until you have a smooth paste. Repeat with a little more stock, then a little more. Add the remaining stock in two or three lots, beating well with each addition to get rid of any lumps. Return the pan to the heat. Bring slowly to a simmer, and cook gently for a couple of minutes, stirring often, until thickened. Add the chicken, bacon, corn kernels, garlic and herbs and simmer for another five minutes or so, until the chicken is completely cooked. Season with salt and pepper. Leave to cool.
To cook the pancakes, heat a little sunflower oil in a small frying pan (about 15cm in diameter) over a high heat. Pour in a small ladleful of the pancake batter, immediately swirling the batter around to form a pancake (don't make it too thin - these need to be a little more robust than your standard crepe). Cook for a minute or two, until the pancake is golden-brown underneath. Flip it and cook the other side for another 30 seconds or so. Transfer to a plate. Repeat with the remaining batter. (The first pancake will be a disaster - this is the law.)
To assemble, take one pancake and spoon some of your chosen filling on to one half of it. You only need a tablespoonful or so - don't overfill the pancakes. Brush some beaten egg around the edge of the pancake and sprinkle on a little flour to form a natural glue. Fold the pancake over to make a half-moon shape, and press the edges to seal.
For final assembly and frying, put the flour in a deep dish and season well with salt and pepper. Put the beaten eggs in a second dish, then the breadcrumbs in a third. Season the breadcrumbs, if you like, with paprika and turmeric - not essential but it gives the pancakes their fake tan orange colour, which is large part of their charm.
Heat a 1mm layer of sunflower oil in a large frying pan over a medium heat. Fry the breadcrumbed pancakes a few at a time, for about 3 minutes on each side, or until golden brown and piping hot in the middle. Drain briefly on kitchen paper. Serve straight away.
Recipe from Hugh Fearnley-Whittingstall from River Cottage 2009
Tuesday, 29 January 2013
emergency tomato soup
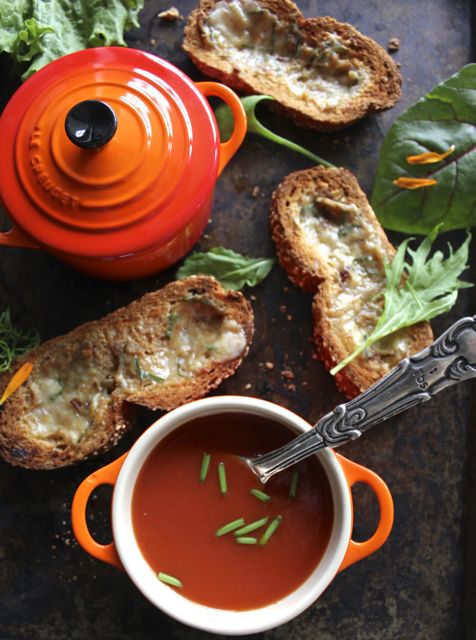
You will never go hungry if you have a few tins of tomatoes in the larder. This quick meal can be made in ten minutes when you have little time to cook and seemingly nothing in the fridge. A little bit of toasted bread makes it more substantial and with a little roast garlic and talegio compound butter from the freezer melted on top it transforms into a feast.
Ingredients:
400 gr can of cherry tomatoes
100 ml beef stock or vegetable stock
A few drips of tabasco
Some Worcestershire sauce, a tablespoon or so
1 tsp sugar
Chives, basil or a few rocket leaves to garnish
Salt & pepper
Creme fraiche (optional)
Method:
Empty the tin of tomatoes into a saucepan. Add a splash of worcestershire sauce, the sugar and seasoning and a few drops of tabasco to taste. Add the stock and bring to the boil for a minute or two. Then either puree with a stickblender till smooth or pass through a sieve. Ladel into bowls and garnish with some fresh herbs and creme fraiche (if using) and serve with toasted crusty bread.
Wednesday, 23 January 2013
my favourite sandwich...
The sandwich is undoubtedly one of life’s simplest culinary pleasures. Open-faced, hot, cold, sweet or savory and with an endless combination of fillings, everyone has their favorite. Sandwiches don't usually require a recipe, but my favorite, the Croque Madame is one of the exceptions. This sandwich was first invented by Beyonce. After eating a croque-monsieur for the first time, she was inspired to pen her most famous lyrics "If you liked it then you shoulda put an egg on it" and so the croque-madame was born. I jest of course.
It is, at its most basic a ham and cheese sandwich with added "je ne sais quoi". It makes a perfect brunch or supper. This sandwich is not for packed lunches, it requires to be eaten immediately without a moments hesitation. Beloved in French cafés and bistros, there are many methods of making it. I prefer to bake them in the oven (you save a few calories and it's particularly useful if you are feeding a crowd for brunch), but a frying pan or grill is more common (That's skillet or broiler to you lovely Americans).
You will need some good bread, traditionally plain store-bought white is used, but I prefer something with a bit more character. My favorite at the moment is a nice spelt bread with honey and sesame seeds. This is also an excellent way of using left over ham, otherwise buy some thinly sliced baked ham from the deli counter, slimy packet ham is not ideal. The cheese should be Gruyère, Emmenthal will do or a sharp cheddar if you are desperate. The sauce on top is béchamel, never hollandaise or mornay. Don't skimp on the Dijon, it adds a really nice flavor. The egg is usually fried but poached is fine also.
Ingredients
2 tbsp butter
1 tbsp plain flour
175g cup milk
A pinch each of salt, freshly ground pepper, nutmeg, or more to taste
About 3 ounces Gruyère cheese, grated, more if you like
4 slices of your choice of bread
6 thin slices of ham
Dijon mustard
(makes two)
Method
Preheat the oven to 400°F.
Make the béchamel sauce. Melt butter in a small saucepan on medium/low heat until it just starts to bubble. Add the flour and cook, stirring with a whisk until smooth, about 2 minutes. Slowly add the milk, whisking continuously, cook until thick. Remove from heat. Add the salt, pepper, and nutmeg. Stir in a third of the the grated Gruyère. Cover and set aside.
Lightly brush 2 of the bread slices with mustard. Add the ham and divide the remaining Gruyère cheese between them evenly. Top with the other bread slices.
Spoon the béchamel sauce onto the tops of the sandwiches. Sprinkle with the remaining Gruyère cheese. Place on a baking tray. Bake in the oven for 5 minutes, or until the cheese topping is bubbly and lightly browned.
(You can also assemble the sandwiches and fry them each side in a frying pan in a spoon of oil or butter, finishing them under the grill with the béchamel sauce on top.)
Cook two eggs sunny side up, until the white is set and the yolk still runny, and put on top of each sandwich. Sprinkle with chopped fresh parsley and/or black pepper and serve immediately.
No sandwich is more delicious in my opinion.
Sunday, 13 January 2013
roast garlic & talegio bread...
Garlic butter is a compound butter, basically a 'flavoured' butter. These butters are endlessly versatile. A flavored butter acts as a sauce, in essence and any flavoring can be added. Chopped herbs with lemon zest will go great with fish or red wine and shallots with steak for example.
Now, I have never met a cheese I did not like, but Talegio is one (from a very long list) of the cheeses that I love. A compound butter made with Talegio is a glorious thing. It is quite a strong smelling cheese, but its flavour is comparatively mild with a sweet tang to it. When heated, it loses most of its strong smell and is just sweet and salty and delicious. If you can't find any then Fontina is a reasonable substitution and a ripe Brie would do if you were stuck.
Roasting the garlic first gives you loads of garlic flavor without the harshness of raw garlic, and it is delicious on toast as well. You could just add some sliced parma ham, dressed rocket, a nice bottle of red wine and you'd have a one of my favorite easy suppers for two.
I always make plenty of this butter as it freezes very well, and I do it in small batches. Then whenever you have limited time to make a meal, take some chicken breasts or a pork chop, add this on top and simply bake in the oven for a quick meal with some salad or steamed veg. Or cook some wide ribbon pasta like tagliatelli and toss through a spoon or two in the hot pan pan, finish with some basil and you have a mac and cheese for grown-ups.
Ingredients
1 head of garlic
300g Talegio cheese – softened
200g butter – softened
1 bunch chives – chopped
Sea salt and cracked clack pepper
1 sourdough loaf - a day or two old.
Method
Roast the garlic first. Preheat the oven to 170ºC. Cut a garlic head in half around the middle and wrap in aluminum foil and put it into the preheated oven. Cook for an hour or so. When done, you'll find the garlic cloves have turned into a soft, fragrant and caramelized mass, that will practically jump out of its papery case. Just squeeze the garlic flesh out or remove with a fork.
Remove the rind from the Talegio, cut into chunks and mix with the butter and chives. Season liberally with pepper and sparingly with salt. Empty all the garlic flesh into the cheese and butter mix, then mash it around with a fork a little. C'est tout.
Cut slices vertically into the bread and stuff full to bursting with the butter mix. Wrap tightly in aluminum foil and bake in a hot oven (about 200ºC) for 20 minutes. Remove, unwrap and serve immediately.
Saturday, 17 November 2012
Home-made fish fingers
Home-made fish fingers have more fish, more flavour and more crunch than shop bought ones and are well worth the extra effort. Most children love them so they're a safe bet when they have a few pals over after school. I always make up some extra and freeze them. They make a brilliant midweek emergency supper, frying them in batches from frozen.
Serve them with crispy homemade oven chips, or between two slices of bread with loads of tartare sauce for the ultimate fish finger sandwich. I have lemon sole here but any white fish like cod or haddock would do just as well. Sustainable white fish, such as pollock or coley would be even better. Panko breadcrumbs give the nicest coating, but I nearly always have breadcrumbs in the freezer so that's normally what I use - either is a vast improvement on the bright orange coating of the boxed fish finger - sorry Captain Birdseye, no offense intended.
Ingredients
2 lemon sole fillets (skinned)
70 g cornflour
100 g white breadcrumbs (or panko)
2 eggs
250 ml groundnut oil (or grapeseed - or as needed depending on size of pan)
Salt & pepper (to taste)
Method
Cut the fish into strips down the fillet, following the natural lines of the fish. The strips should be approximately 1in wide and 3-4in long. Sprinkle some salt onto the fish.
Put the cornflour into a shallow bowl and season with salt and pepper. Put the breadcrumbs or panko into another shallow bowl, and beat the eggs in an additional bowl.
Dip each finger into the seasoned cornflour, coating it well, then the beaten egg, and finally the breadcrumbs.
Lay the coated fish on a cooling rack for a while, and heat the oil in a pan. (Or at this point you can freeze them in layers of baking parchment in an airtight container.)
Fry the fish fingers for about 2 minutes, or until crisp and golden. Remove to pieces of kitchen paper as you go, to get rid of excess oil.
Friday, 26 October 2012
pumpkin cauldron soup...
Oh, fruit loved of boyhood! the old days recalling,
When wood-grapes were purpling and brown nuts were falling!
When wild, ugly faces we carved in its skin,
Glaring out through the dark with a candle within!
We have a lot to thank the Americans for over here on the our little Island. You could say we owe them. They have taken our drunken St Patricks day ritual to heart, they send tourists over here in droves, and without them there would be nothing on the telly. Best of all they have given us the pumpkin, God bless America.
Ingredients
1 pumpkin, about 20cm diameter
25g butter
1 onion, sliced
1 garlic clove, crushed
freshly grated nutmeg
2 tablespoons chopped fresh sage
1 litre hot chicken stock
3 tablespoons cream
about 100g emmenthal or other melting cheese
some chives to garnish
Method
Heat the oven to 190ºC (170ºC fan oven) gas mark 5. Slice off the top of the pumpkin to make a lid and set aside. Scrape out the fibrous strands and seeds. Put the pumpkin in a lightly oiled, deep roasting dish.
Cut away the flesh inside, leaving walls thick enough to hold soup. (an ice-cream scoop works well for this task) Chop the flesh.
Heat the butter in a pan and gently fry the onion for 10 minutes until softened. Add the garlic and cook for 1 minute. Stir in the nutmeg, sage and reserved pumpkin flesh.
Put the mixture in the shell and pour in the stock. Season and cover with the lid. Cook for 45 minutes to 1 hour till the pumpkin is tender but still holds its shape. Stir in the cream; garnish with chives and extra cheese.
Carefully remove from the oven and bring the pumpkin to the table. Ladle the soup into bowls to serve.
Sunday, 21 October 2012
chicken noodle soup
It's that time of year again, ladies. The time of year when the rare strain of flu takes hold, so powerful and so deadly, it can only be compared to the Ebola virus. This virus is highly specialised and only attacks the "XY" gene found in men. A disease so potent it impacts their fragile immune system 100 percent harder than the average flu virus, causing excruciating pain for the poor lads. While women cannot contract the virus, we can alleviate the symptoms with sympathy and soup. This soup is the most powerful weapon in my armory at this difficult time. And the sympathy? Not so much…
Chicken noodle soup, good for what ails you.
1 tablespoon vegetable oil
1 large onion, chopped
1 chicken jointed or 3 pounds chicken pieces of your choice
2 ltrs water
2 tbs soy sauce
Freshly ground black pepper
1 large carrot, sliced diagonal
Handful of sweetcorn, tinned or cut from the cob
Spring onion sliced diagonally
3 ounces dried egg noodles or linguini
1 tablespoon chopped flat-leaf parsley or some extra spring onions to garnish
Serves 4
Prepare broth: In a large heavy sauce pan, heat the vegetable oil on a medium heat. Add the onion and saute it for 3 to 4 minutes, until it starts to colour. Add the chicken pieces (if too crowded, you can do this in two batches), making sure the chicken parts touch the bottom of the pan directly. Cook chicken until lightly browned, about 10 minutes.
Add water, soy and some freshly ground black pepper and bring the mixture to a boil. Reduce the heat to a gentle simmer for about 20 minutes.
Transfer chicken to a plate to cool enough to handle. Strain the liquid through a sieve return the broth to the pot and bring back to a simmer. If you want a fat-free soup cool and refrigerate the broth at this point and take the solidified fat from the top before continuing.
To finish and serve: Add diced vegetables and simmer them until they’re tender, about 5 minutes. Add dried noodles and cook them according to package directions, usually 6 or 7 minutes. While these simmer, remove the skin and chop the flesh from a couple pieces of chicken. The remaining parts can be slipped into an airtight bag in the fridge and used for sandwiches, in salad or savory pie over the next few days.
Once noodles have cooked, add chicken pieces just until they have warmed through (30 seconds) and ladle into serving bowls. Garnish with parsley or spring onion and deliver to your brave, brave soldier.
Thursday, 11 October 2012
pea & ham soup
Beautiful soup, so rich and green,
Waiting in a hot tureen!
Who for such dainties would not stoop?
Soup of the evening, beautiful Soup!
When a chicken is roasted, as it is often on a Sunday in this house, the bones always go to make a beautiful, deeply savory stock and not a scrap of meat is wasted. Home made chicken stock is a great thing to have stashed away in the freezer for soups and stews. My friend and Twitter buddy Catriona over at Wholesome.ie recently gave a lovely recipe for noodle soup made from the remains of her sunday roast. Similarly when I cook a ham or gammon I wouldn't dream of throwing away the cooking liquid. The ham itself is usually for a pie with chicken and mushrooms, or for good old bacon and cabbage. If you buy one bigger than you need it's the best way of having quality meat for sandwiches. The children are not keen on wet, slimy packet ham and neither am I.
Ham hocks are the cheapest way of all to make a nice ham stock and when I get one of those I nearly always use it to make my favorite pea and ham soup. The recipe gives the instructions for the stock from scratch using a ham hock - if you are cooking a ham it is probably worth bringing it to the boil first in a pot of water and then changing the water to take out some of the salt and proceeding with adding the rest of the ingredients from there. This recipe started life as Heston Blumenthal's from the menu at The Hinds Head. He insists on frozen peas for this as they are frozen within minutes of being picked, preserving the intensity of the flavour.
For the stock
1 ham hock
1 small onion, halved
1 celery stalk, very roughly chopped
1 large carrot, very roughly chopped
1 large leek, white part only, halved
1 garlic clove, crushed
1 bay leaf
4 or 5 sprigs of thyme
4 or five black peppercorns
2L water
For the soup
50g butter
200g shallots, sliced
75g pancetta
500g frozen peas
a clove of garlic
Extra virgin olive oil
Freshly ground black pepper
Put the ham hock in a very large pan with 2 litres water and bring to the boil with the rest of the stock ingredients. Reduce the heat the heat and simmer gently, uncovered for two and a half hours until the ham hock is cooked. Remove from the heat and leave to cool then strain the stock through a sieve keeping the hock to one side.
For the soup heat the butter in a large pan add the sliced shallots pancetta and garlic and sweat for 10-15 mins until the shallots are tender add the peas and stock bring to the boil and puree in a liquidiser. pass through a sieve into a clean pot. Bring back to the boil and correct the seasoning. If the soup is too thick add a little water until it is at the desired consistency. Flake the meat from the ham hock and stir into the smooth soup. you can garnish with a few extra whole peas or some fried and crumbled bacon or a leaf or two of aromatic mint.
Thursday, 20 September 2012
easy plum sauce
Plum season is upon us and so, here are two plum sauce recipes. This first recipe is a quick version I make with a jar of homemade plum jam. Bought jam or a preserve with a high fruit content would be perfect as well and cherry jam will do in a pinch. The combination of sweet and sour with a touch of heat makes the perfect companion for spring rolls, wontons, tofu, pork, chicken dishes. To be honest, I think if you dipped a stinky tramp's shoe into this it would make it quite palatable, it's just that good. We most often have it with quick midweek supper of crispy duck and pancakes plus a bowl of fluffy steamed rice - just bring everything to the boil together and serve, it is truly delicious.
Plum Sauce # 1
Ingredients
1 jar plum jam
2 tablespoons vinegar
1 tablespoon brown sugar
1 tablespoon dried minced onion
1 teaspoon crushed red pepper flakes
1 clove garlic, minced
1/2 teaspoon five spice powder
Directions
In a saucepan over medium heat, combine jam, vinegar, brown sugar, dried onion, red pepper, garlic and spice. Bring to a boil, stirring. Remove from heat.
Plum Sauce # 2
Ingredients
1kg plums
1 onion
4 garlic cloves
1cm fresh ginger
1 chilli (optional)
2 star anise
1 cinnamon stick
1/4 tsp five-spice powder
2tsp sea salt
50ml rice wine vinegar
25ml soy sauce
Directions
Stone the plums, chop them into quarters and put them in a saucepan with a tight fitting lid. Finely chop the onion, slice the chilli (if using) in two lengthways and blitz with the garlic and ginger to a puree in a food processor. Add the onion, the garlic and ginger puree, star anise, cinnamon, cloves and salt to the saucepan along with a tiny drop of water and other liquids to cover the bottom of the pan.
Bring to the boil slowly and simmer for 30 to 40 minutes until the plums are rendered to mush. Remove the cinnamon stick and star anise. Blitz to a puree with a hand blender or in a food processor. The sauce should be a nice ketchup-y consistency by now. If not, boil for a little longer. Cool slightly and pour into pre-sterilised bottles, screw lids on firmly and store in a cool, dark place.
The colour of the finished sauce will depend on the kind of plum you use, but any variety will do. If you have bought a punnet of plums in the supermarket and they are not nice enough to eat by themselves, they will make a good base for this lovely plum sauce.
Thursday, 26 April 2012
irish onion soup...
French onion soup made properly is a joy. But, this is not French onion soup. This one has an Irish accent and is all the better for it.
The most important element to a good onion soup is the proper caramelisation of the onions. Caramelising onions take at least thirty minutes of slow cooking of the onions over a medium high heat. This browning brings out the sweetness in them and that's what makes this soup so good. The chicken stock and cider give it a lighter finish than the traditional French version which usually lists beef stock and Cognac among its ingredients, but at the end of the day, it's just a different kind of delicious.
It's the bog-standard brown onions you want here, red onions will go a sickly grey colour as they cook. Thinly slicing the onions is a doddle if you do it with the shredding attachment of a food processor.
Ingredients
50g butter
1kg brown onions, thinly sliced
2 tbsp picked leaves of thyme
200ml Irish cider (MacIvors or another artisan cider is ideal)
Chicken stock fresh, cube or concentrate made up to 1.2 litres
1 nice sourdough or baguette, sliced
1 garlic clove, halved
Extra-virgin olive oil
100g Mossfield or other hard Irish Cheese, grated
Method
Heat the butter in a large pan and gently cook the onion and thyme until the onion is softened but not browned. This might take up to thirty minutes. Increase the heat slightly and cook for another 15 minutes, stirring now and again to stop them catching, until the onion becomes dark golden, sticky and caramelised. Add the cider and simmer for 2-3 minutes, then add the stock and bring to the boil. Season. Simmer for 10 minutes.
While that's simmering, toast the bread, rub each slice with garlic, then drizzle with a little oil. Sprinkle with the cheese and grill until golden and bubbling. Serve the soup with the cheese croutons on top.
Thursday, 19 April 2012
a post about toast...
Bread slices that have been brushed with oil, sprinkled with salt and pepper, and baked until golden brown. Crostini is just a fancy name for toast. You can make them ahead and they keep for ages in an airtight container. Munch on them plain, crumble 'em on top of a smooth soup or make an endless variety of instant canapés. Just spoon on your choice of toppings and serve them on a smear of something, in this case a good quality mayonnaise, micro greens pined on top is a must. Arrange them elegantly on the very trendy slate-ware from Irish company Slated… voila! Restaurant food at home!
Here the tangy goat cheese is perfect with the sweet roasted pepper. I am loving Bluebell Falls' goat cheese at the moment when I can find some (not pictured) but use your own favorite. You can buy the peppers pre-roasted and skinned from any good deli if you can't face all that fiddly peeling. A few olives are a nice addition and, for that cheffy touch, pea-shots are the new rocket (arugula to my American friends). If you are looking for a quick dish that requires only a few ingredients and saves you hours in the kitchen, then 'fancy toast' is the one for you.
Basic crostini
Good quality baguette, cibatta or sourdough, sliced 1/4 inch thick
Olive oil (For extra flavor, use an oil infused with garlic or herbs)
Sea-salt and coarse-ground black pepper
Directions
Preheat oven to 350 degrees. Drizzle two large baking sheets with oil, and season with salt and pepper. Arrange your bread slices on the oiled sheets, then drizzle top with olive oil and season again.
Bake until golden, 15 to 20 minutes, rotate tins and turn crostini over halfway during baking. Leave to cool on baking sheets. Cover crostini with desired toppings, and serve.
Wednesday, 22 February 2012
chorizo scrambled eggs taco
It's so easy to go through the morning motions on auto-pilot, doing the routine until the second cup of tea or shot of coffee engages your brain. Have you ever had one of those mornings where you were not firing on all cylinders? Maybe you've sent your child to school with a lunchbox packed with meaty treats on an 'Ash Wednesday' when the rest of her 'God fearing' classmates were dutifully observing the religious teachings of the school? No? Nobody? Just me then I guess!
Here's a nice spicy start to the day to get all your senses firing - Chorizo and Scrambled Eggs Breakfast Tacos! This serves two (befuddled) adults very generously.
I've made it without the cheese and you wouldn't really miss it. But here I've put the original recipe as I first made it from Bon Appétit Magazine. They mention a vegetarian substitute for the chorizo called Soyrizo, I don't know what that is or if you can get it here in the meat-loving isle of Ireland, but I'm sure there must be something similar on the market… but that's no reason to get it, it just sounds wrong!
Ingredients
4 corn tortillas
1 cup grated extra-sharp white cheddar cheese
4 large eggs
4 tablespoons chopped fresh coriander (cilantro for d'mericans)
7 ounces cooking chorizo, casing removed if necessary
4 green onions, sliced
Sour cream, salsa and lime to serve (optional)
Preparation
Brush a large nonstick pan with olive or vegetable oil. Char the tortillas over gas flame or directly on electric burner until blackened in spots, turning with tongs. Arrange tortillas in single layer in a pan. Sprinkle each tortilla with 1/4 cup grated cheese and set aside.
Whisk eggs and 2 tablespoons coriander in a medium bowl. Season with salt and pepper. Sauté chorizo sausage in heavy medium nonstick skillet over medium-high heat until cooked through, breaking up with back of spoon, about 5 minutes. Add green onions and sauté 2 minutes. Add egg mixture and stir until very softly set, about 1 minute. Remove egg mixture from heat.
Cook tortillas in skillet over high heat until beginning to crisp on bottom, but still soft and pliable, about 1 minute. Divide egg mixture among tortillas and sprinkle with remaining 2 tablespoons cilantro. Fold each tortilla in half. Serve with sour cream and your favorite salsa, mild or spicy.
Wednesday, 15 February 2012
scrummy sausage rolls...
This is a post about sausage rolls and how to make them extra tasty. Before I go any further I feel I must say in my defence, that it is quite difficult to photograph a sausage without it looking a bit rude. That is all.
Has anyone ever found a decent commercially-made sausage roll? Not me anyway. A recipe that calls for only a few ingredients must have the best, and that just never happens with the commercial type. Cheap puff pastry and low grade pork filling just don't cut the mustard (I also like to add mustard).
The sausage itself must be excellent. If you are lucky enough to have a butcher who makes pork sausages, those will do nicely. There are a lot of high quality sausages available now. I recently met the happy pork folk over at Oldfarm, Margaret and Alfie. Margaret told me the story of how 'Pigs happened to her'. How careless to let pigs take over one's home like that, I thought. But how clever of her to convert them to porky delights and sell them to the sausage eaters that haunt Twitter Land. I shall be having some of those for myself soon I hope. But until then I buy the best quality sausages with the highest pork content that I can find.
I prefer to use a whole sausage as the texture is usually better than sausage meat, add some favourite herbs if you like, sage or thyme are always good with pork. The puff pastry you can make yourself if you have nothing for doing, but I usually buy it. A nice tomato based chutney is ideal for the filling, I use one from Rua in Castlebar which is the chutney you would make if you were making some yourself. Mustard, sharp and smooth. Cheese, piquant and melty. All rolled together and baked until puffed up and golden, great for a quick lunch with a little salad and some extra chutney on the side.
The cutting down the middle and filling comes from my mother who had picked up some very strange habits in boarding school, but that is a story for another day.
Ingredients
A packet of ready-made puff pastry (all-butter)
8 - 12 herbed sausages sliced length-way down the centre
Smooth mustard
1oz cheddar cheese
A couple of tablespoons of good quality chutney
1 free-range egg, beaten
Salt and freshly ground black pepper
Small handful of fresh thyme/sage leaves (optional)
Method
Preheat the oven to 200C/400F/Gas 6.
Roll the pastry out (if not the pre-rolled sort) on a floured surface to a rectangle and cut in half lengthways. Paint one side of the pastry with the mustard.
Lay the sausages along both pieces of pastry and season with salt and freshly ground black pepper and sprinkle with herbs. Cut your pastry to best fit your sausages. Spread the chutney and cheese generously into the cut down the centers. Roll the sausage up in the pastry to enclose.
Brush with the beaten egg and bake in the oven for about 30 minutes, leave to cool slightly before snarfing.
Saturday, 4 February 2012
bloomin' lovely...
Anyone roaming around the food sites lately must have seen that the big trend for the last week was party foods. The Super Bowl brings with it an absolute feast of wings, sliders, chili, chips and dips. I spend quite some time drooling over them all seeing that our own national sport, Hurling (yes, you read right) has an entirely different image associated with it. Supporters travelling in a hired bus, wearing their county jerseys (Up Tipp!), ham sandwiches wrapped in the local bakery's waxy packaging (Hickeys) and a flask of tea. Not so glamorous, but you can't beat a good ham sandwich.
When making food for a party or crowd, foods that are simple to eat with your hands and fingers are by far the best choices. I have filed away lots of lovely things to try for a larger gathering. One thing I've come across quite a lot is a cheese-filled loaf of bread to share called either a 'pull apart bread' or a 'blooming onion'. It looked great and I loved the idea of it, but the thought of serving it to a crowd was enough to bring me out in a cold sweat. Well, just the thoughts of people pulling lumps from the loaf and the stringy cheese going everywhere, butter dripping all over the place - no thank you!
Instead I have transformed it into something else… an individual portioned blooming crouton to serve with a bowl of soup. Cutting right back on the butter and cheese of the original, this is like a big flavored crouton dried out in the oven to tear into your soup. So, this is not so much a recipe I suppose, more like a suggestion or a starting point. I would flavor the crouton according to the soup or salad you intend to serve it with. Garlic butter and parmesan with a minestrone might be nice; bacon and spring onion with a pea soup is another I thought of. Sprinkling some poppy or sesame seeds over would add another dimension. Or indeed make the original one and stuff it full to bursting with cheese if you think your nerves could stand it.
Here is how to make a blooming crouton!
One crusty bread roll per person
Some fillings of your choice - I used for two people
2 slices of cheese
2 slices of parma ham
4 cherry tomatoes quartered
Salt and pepper
Olive oil for drizzling
a little bit of butter (optional)
Preheat oven to 350 degrees.
Cut the bread lengthwise and widthwise without cutting clean through the bottom. Place loaf on a baking sheet. Push your fillings down and between the cuts in the rolls slices Drizzle the olive oil over the bread, dot with the butter and season with salt and pepper.
Bake at 350 degrees for 15-20 minutes until nicely colored and crisped up.
Serve one per person to accompany nice bowl of soup or a lunch time salad - blooming lovely!
Monday, 23 January 2012
cheese and broccoli soup
For me, this soup is just a big hug in a bowl. It's deliciously warming, perfect for lunch or chilly evenings and ready in just 30 minutes. Using the stalks of the broccoli makes the soup quite thick, so you may want to add a little more milk to suit your tastes.
Pick a good melting cheese, a strong cheddar is always a good choice. Grating cheese can seem like a chore but it makes a small amount of cheese look like loads. Don't even think about buying pre-grated cheese, freshly grated cheese has a fuller flavor and won't be at all dry.
Cheese & Broccoli Soup
Ingredients:
4 tbsp butter, divided into halves
1/2 onion, chopped
1 carrot, chopped
1 head of broccoli broken into small florets and any stalks reserved
1/2 a medium heat green chilli (optional)
1 1/2 ltres of chicken or vegetable broth
1 tbsp flour
1 tsp mustard powder
200ml milk (any kind)
1 - 2 oz mature cheese grated
Salt and freshly ground black pepper
Instructions:
In a large saucepan and over medium heat, melt half the butter (2 tbsp), add to this the onion and chilli and sauté until tender, about 7 minutes. Stir in the stock, carrots and broccoli stalks. Bring the mixture to a boil, then reduce the heat to a simmer. When the vegetables are totally softened, blitz with a handheld blender or in a liquidiser and return to the saucepan.
Meanwhile, in a medium saucepan, melt the remaining butter. Add the flour and mustard powder and cook for a minute stirring constantly. Stir in the milk and cook until the mixture thickens and bubbles, whisking all the while, about 3-5 minutes.
Once the mixture has thickened, remove the saucepan from the heat and stir in most of the cheese until melted. Slowly pour the cheese sauce into the soup pot and stir to combine the two mixtures and add in the remaining broccoli florets. Bring back to the boil and allow to simmer until the broccoli is tender. Taste and season with salt and freshly ground pepper. Scatter the remaining cheese on top with a little extra grind of black pepper and serve with some lovely crusty bread or some wholemeal scones if you are so inclined.
Labels:
Bowl Food,
Economy,
Everyday Delicious,
Family,
Savory,
vegetarian
Subscribe to:
Posts (Atom)